Saturday, May 11, 2013

Hello! Welcome to my blog and thank you for stopping by. I design and create handcrafted greeting cards. I like to call this passion of mine "visual poetry" ....imagery on paper. Please feel free to browse the photos of my cards and leave a comment.

Tuesday, August 29, 2017

Western Birthday


Hello!  Today I have a card to share that I made for one of my nephew's birthdays.  It's always a challenge to come up with a masculine card. So...while surfing the web I came across one of Theresa Momber's cards and was inspired to create this birthday card for my nephew. Theresa is an illustrator for Gina K. Designs and extremely talented. I love her creations! Thank you, Theresa!

I began by creating my main focal panel using various inks to sponge my background:  GKD Sweet Corn, Memento Cantaloupe, Desert Sand and Rich Cocoa. Various grass images were stamped at the bottom of this panel in Memento Rich Cocoa

Next, I created the fence posts by swiping Memento Rich Cocoa on some narrow cut strips of white card stock and then adding bronze brads to connect them. The fence post was positioned on the panel in order to determine where I would be placing my birthday greeting, which was stamped in Memento Tuxedo Black ink and then embossed with clear EP.  Some birds in flight were stamped and embossed above the birthday greeting using the same ink and EP. The fence post was then adhered to the panel using dimensionals.

Jute was used to create the lasso hanging on the fence post and adhered lightly. The cowboy hat and boots were cut with Tessler Crafts using PTI Dark Chocolate card stock and  then matted with GKD Kraft card stock. These were then positioned and adhered to the card with dimensionals.

My base card was created using GKD Warm Cocoa. It was layered with GKD Sweet Corn. Another layer of PTI Dark Chocolate was added. Finally the focal panel was adhered and my project was complete.

Hope you were inspired to create!  Until next time, have a great day!

Sunday, August 20, 2017

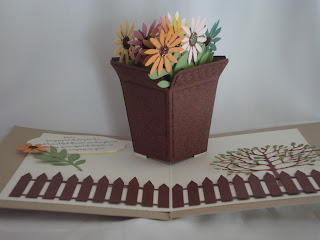
Birthday Flower Pot Pop-Up

Inside of card
Front of card

Hello crafters!  It's my favorite daughter's (and my ONLY daughter's) birthday this month. I decided to get out of my comfort zone and create a pop-up card for her.  It was a tedious challenge and required lots of patience. Here's the end result.

Without going into lengthy detail on how the inside pop-up was created I have provided a link to a Karen Burniston video on how to assemble and create the pop-up.  Karen has a several pop-up dies which can be purchased at various craft sites. She does a great job in her video tutorial with step by step instructions.

For the front of the card, I first computer generated my sentiment on ivory card stock.  Next I die cut butterflies on ivory card stock using Memory Box Reverse Butterfly Collage. Then I embossed a border/frame around the panel using a die from Spellbinders Radiant Rectangles.  Glitter was added to the center of the butterflies for accent. Dimensionals were added to the back of this panel and then it was matted with pink card stock. Finally it was adhered to the base card.

As I mentioned, it was a tedious task creating the pop-up flower pot and then arranging flowers in it but it was worth the time spent. I'm looking forward to making more of these pop-up cards. 

Thanks for paying a visit!  Come back again soon for more card projects and inspiration.